This is the bag I was working on yesterday,
and it's now on Yahoo auction at a fixed price.
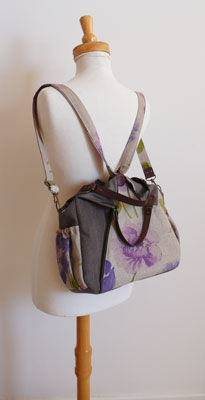
This is the back side of the bag.
I actually love this shape.
Quite complicated to make, but very interesting!
See there's a zipper right at the border from left to right?
Well, I don't need to tell you, but it's a zipper pocket!
And,
Side pocket as usual, deeper with this new style, and wider too!
Very handy for a person who drinks a lot of water when traveling.
The front and back flap is fastened with this small circle hock.
If you don't see it, that's OK!
It's not the main feature anyway.
This black leather handle is the off cuts I got from a leather belt shop in the Freo market.
I just love this chunky-ness of this belt!
The back side has this secret pocket, and
A tulip pocket for your transport pass!
And,
More pockets!!
The front flap opens to
an amazing 3 pockets!!
2 blue ones, and one on the flap.
Can't see it?
Well, you will when you use it.
And, guess what,
More pockets!!
This is the inside of the back flap and it has one zipper pocket.
Now, who can guess what's coming next?
You've guessed it!
More pockets!!
There are total of 4 pockets in here.
Well,
that's all.
Hew...
Did you just ask me why I put so many pockets in one bag?
Well, I put lot of pockets, because...
well..... I can, and
it's nice to get organised, and..
well, it will test your memory!
There!
Looks very nice on the shoulder,
and
looks casually nice like this too,
and...
when you insert a strap through this leather tag at the back,
you can use this bag as...
a back sack!!
Well, hope you enjoyed the introduction to my new bag!
I'll be making more bags tomorrow
and will try to update it on this blog too.
If I don't, then check out my Japanese blog!
You may not understand what I write
but you can see what I did on the picture!